


Disclaimer: I do not own the images which are credited. Those pictures which are credited are taken from sources elsewhere to supplement or support this article for educational purposes only.
Hello all,
With the new emergence of my blog, I've decided to document the process by which I created my first polymer clay sculpture! I needed someone iconic to be my masterpiece, so it's only right I choose our master: Yoda!
Materials I used for creating Yoda:

Let's start off with his face. An old mans' face will always be easy to learn, but difficult to master. Look at the ridges on his forehead, the lines on his eyes, lips and chin. Even his nose bridge have lines. Notice the double/triple eyelids and his wise bulbous eye bags? Once that is out of the way...
Take the time to study the pictures, take note how his body structure is like. I noticed his arms are longer than his legs. Another important feature I find is that Yoda slouches. It could be that he has been living for 800 years, or it could be that this is his habbit. I don't know, either way, he's slouching.
Alrighty! So you've got the materials and you've studied the pictures closely. Let's jump into making the Yoda...
 |
| Source: Comic Vine. Rybo. edited b Frozen Phoenix |
Hello all,
With the new emergence of my blog, I've decided to document the process by which I created my first polymer clay sculpture! I needed someone iconic to be my masterpiece, so it's only right I choose our master: Yoda!
Materials I used for creating Yoda:
- Fimo polymer clay "Classic"(white)
- Galvanized wire
- Wire cutter
- Aluminium foil
- Toaster oven
- Sculpting tool
- X-acto Knife
- Small brush(make sure bristles are close to each other)
- Mr hobby acrylic water based(matt white)
- Mr hobby lacquer (green)
- Daler Rowney acrylic(cadmium brown)
- Daler Rowney acrylic(Lemon yellow)
 |
| Credits:beading.com.my |
 |
| 1. Galvanized wire. Mine is too thick, but I figured I should wait till this is finished before I get a thinner one coz my models are not that huge to need a wire to support that much of weight. |
 |
| 7. X-acto knife. This is a very useful tool for slicing little chunks of clay for a rope for example. I used this for cutting excess. |
 |
| 6.Sculpting tool. The front part is a flexible rubber tool to help smoothen out crevices or just simply touch upon my figures. |
 |
| Flexible rubber point. |
 |
| 8.Small Brush...for painting. DO NOT USE brushes that are white, as those are too rough, it might scratch your clay...just my 2 cents:) |
 |
| 3. Wire cutter. Because scissors can only get you so far in life... |
 |
| 9. Mr Hobby acrylic water based(Matt White). I wouldn't need this if yoda's robes were pure matte white. So this is going to mix with yellow, to achieve that off-white-beige look on his robes. |
 |
| 10. Mr Hobby lacquer based Green. For his skin and parts of him where the sun don't shine. |
 |
| 11. Daler Rowney's Cadmium Brown for the inner robes. |
 |
| 12. Daler Rowney's lemon yellow( to be mixed with white)..Ratio of yellow to white>1:10.Remember that |
 |
| This is a makeshift paint palette, by law, it' supposed to be an ice cube tray. Why? coz you can clean it easier, especially when you're dealing with lacquer. See below. |

 |
| Mr Hobby Color Chart, for reference. |
 |
| Before we begin...HAHAHAHA! always cracked me up source:9gag |
 |
| #1 Reference. Credit: blog.scarecrow.com. This picture is important as it shows his limbs. |
 |
| #2 Reference. Credit: nightscribe.com. Side view of the master |
 |
| #3 Reference. Credit: Comic Vine. Rybo. edited b Frozen Phoenix |
Let's start off with his face. An old mans' face will always be easy to learn, but difficult to master. Look at the ridges on his forehead, the lines on his eyes, lips and chin. Even his nose bridge have lines. Notice the double/triple eyelids and his wise bulbous eye bags? Once that is out of the way...
Take the time to study the pictures, take note how his body structure is like. I noticed his arms are longer than his legs. Another important feature I find is that Yoda slouches. It could be that he has been living for 800 years, or it could be that this is his habbit. I don't know, either way, he's slouching.
Alrighty! So you've got the materials and you've studied the pictures closely. Let's jump into making the Yoda...
 |
| 1.I started of making the armature(bone structure) |
 |
| 2.Covered the structure with aluminium foil to keep it into place until I got this. |
 |
| 3.Slowly I started to sculpt the details. Whether you start with the head first or body first, is solely preference. |
 |
| 4. I prebaked his light saber first. Once done, I inserted it into his hand, like so. |
 |
| 5. Now I begin to sculpt his robes, starting with the innerlayers before moving outwards to his outer robes. This is also the time to insert his fingers and toes. |
 |
| 6. Add some finishing touches here and there. Also I added his eyeballs in, as well as added his eyelids. |
 |
| 7.Once satisfied with the results, bake him in a foil pan according to optimum heat level as indicated by the clay manufacturers' recommendation.(remember to heat the oven around 20 mins first, to keep a steady temperature) |
 |
| 8. Baking is done! now to add some hair on the dude. I used cotton from my pillows and pasted it on his head using- the sculpeys' "bake & bond". Do it while the clay is still hot. |
 |
| Would you look at that!!<3 |
 |
| 9. So I painted him with lacquer green, but kept his robes painted with acrylic water based. I had to paint it a few rounds for the acrylic parts. |
 |
| 10. So I painted the outer robes with white, but it proved to be too white.. |
 |
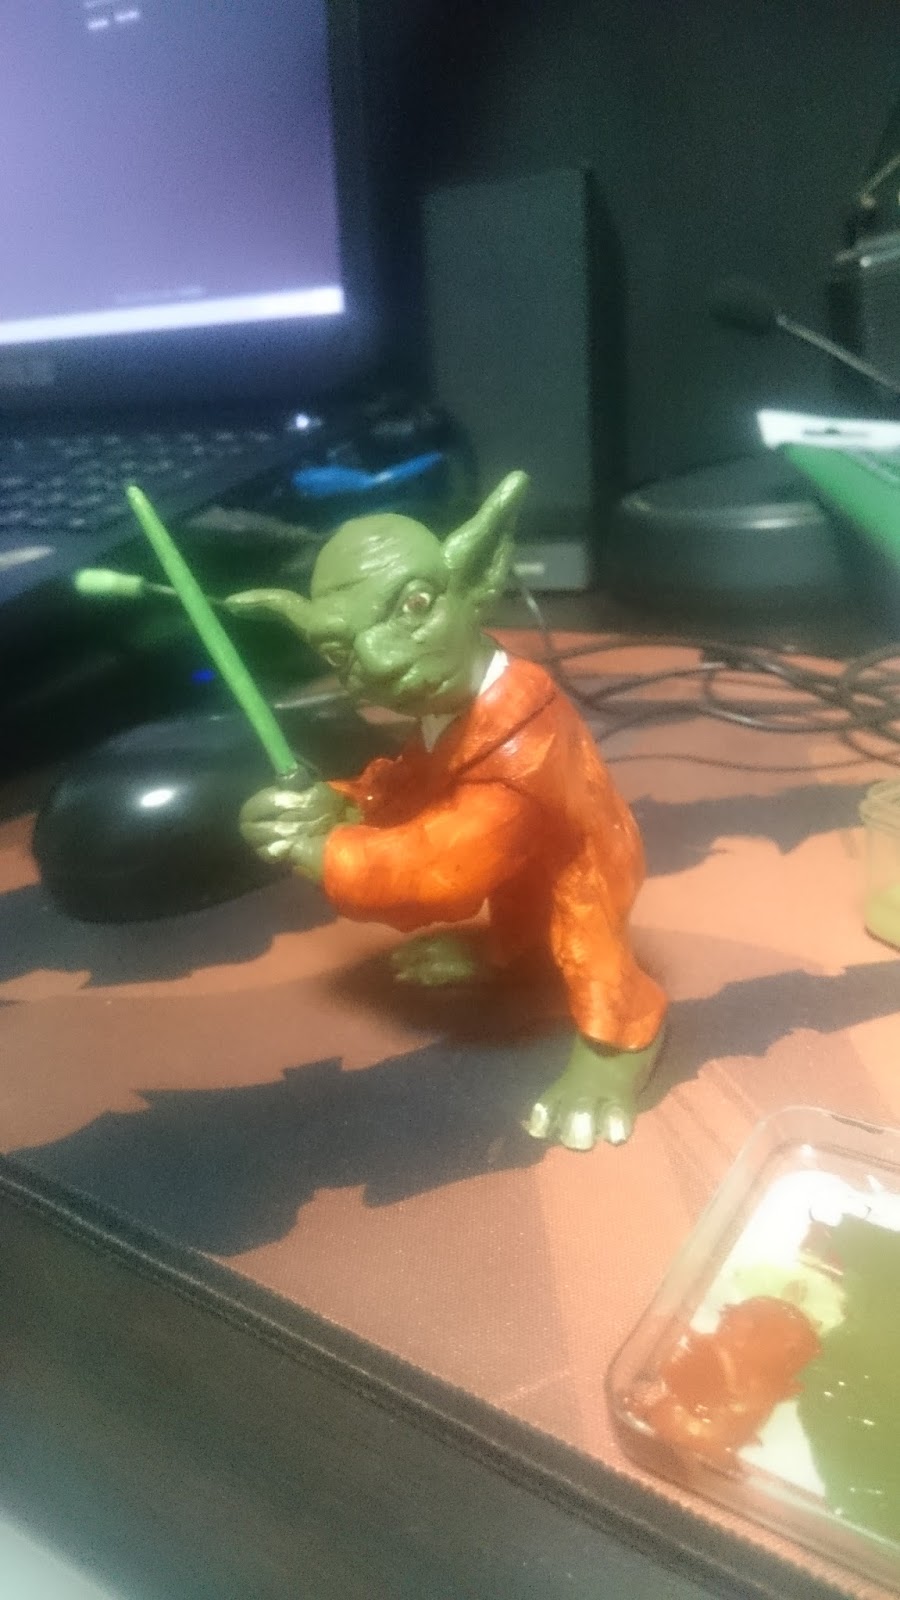
| 11. I mixed the matt white with a little bit of yellow, yellow to white ratio> 1:10. And this is the final piece Boom! Toy Yoda! There you go. Master Yoda, in the flesh. Well, not exactly. Stay tuned for more clay sculptures by me as well as toy Reviews. See You Again! 2015©Confaderal . |

0 comments:
Post a Comment