


Disclaimer: I do not own the rights to this creature, as they belong to valve, as well as the whole Dota 2 franchise. Photos posted here are my own inspired by a creation by Valve. This article is made for the purposes of education.

Dear readers, if you are reading this now...continue reading you are in for a treat.
I'm sure many of you Dota 2 fans have been left inadequate after knowing that many toy makers don't have the rights to make Dota 2 figures.
There has been hearsay that Valve is reluctant to give rights to toy companies to make Dota 2 characters. Then again, nothing is concrete...perhaps they're waiting for the right toy company to come. Oh well.
I have been doing some figures made out of polymer clay for awhile it seems, and in Tinker, I think I might've upped my skill level tremendously.
First I got inspired by this video:
I'd have to say, thank you for inspiring me on this journey to create this figure. And to a certain eager beaver who saw what I did with my custom "Tidehunter" and decided to take a leap of faith in me creating my most beautiful figure yet. You know who you are:)


It is with due frustration and a clear eagerness to dota 2 fandom that I try my hand in creating these creatures that are a huge part of my life(as I'm sure it is yours). If valve is getting no one to commercially do it, then we, as fans, have to create our own to quench our thirst, am I right? or am I right?
Look at that beauty!
It took me a longer period than usual to complete this figure as the mechanical arms does defy gravity. But, where there's a will, there's a way.
If you've been reading this far, I promised you I'll give a treat right? I'm going to bring you through the steps and procedures to make this awesome figure. Ready?


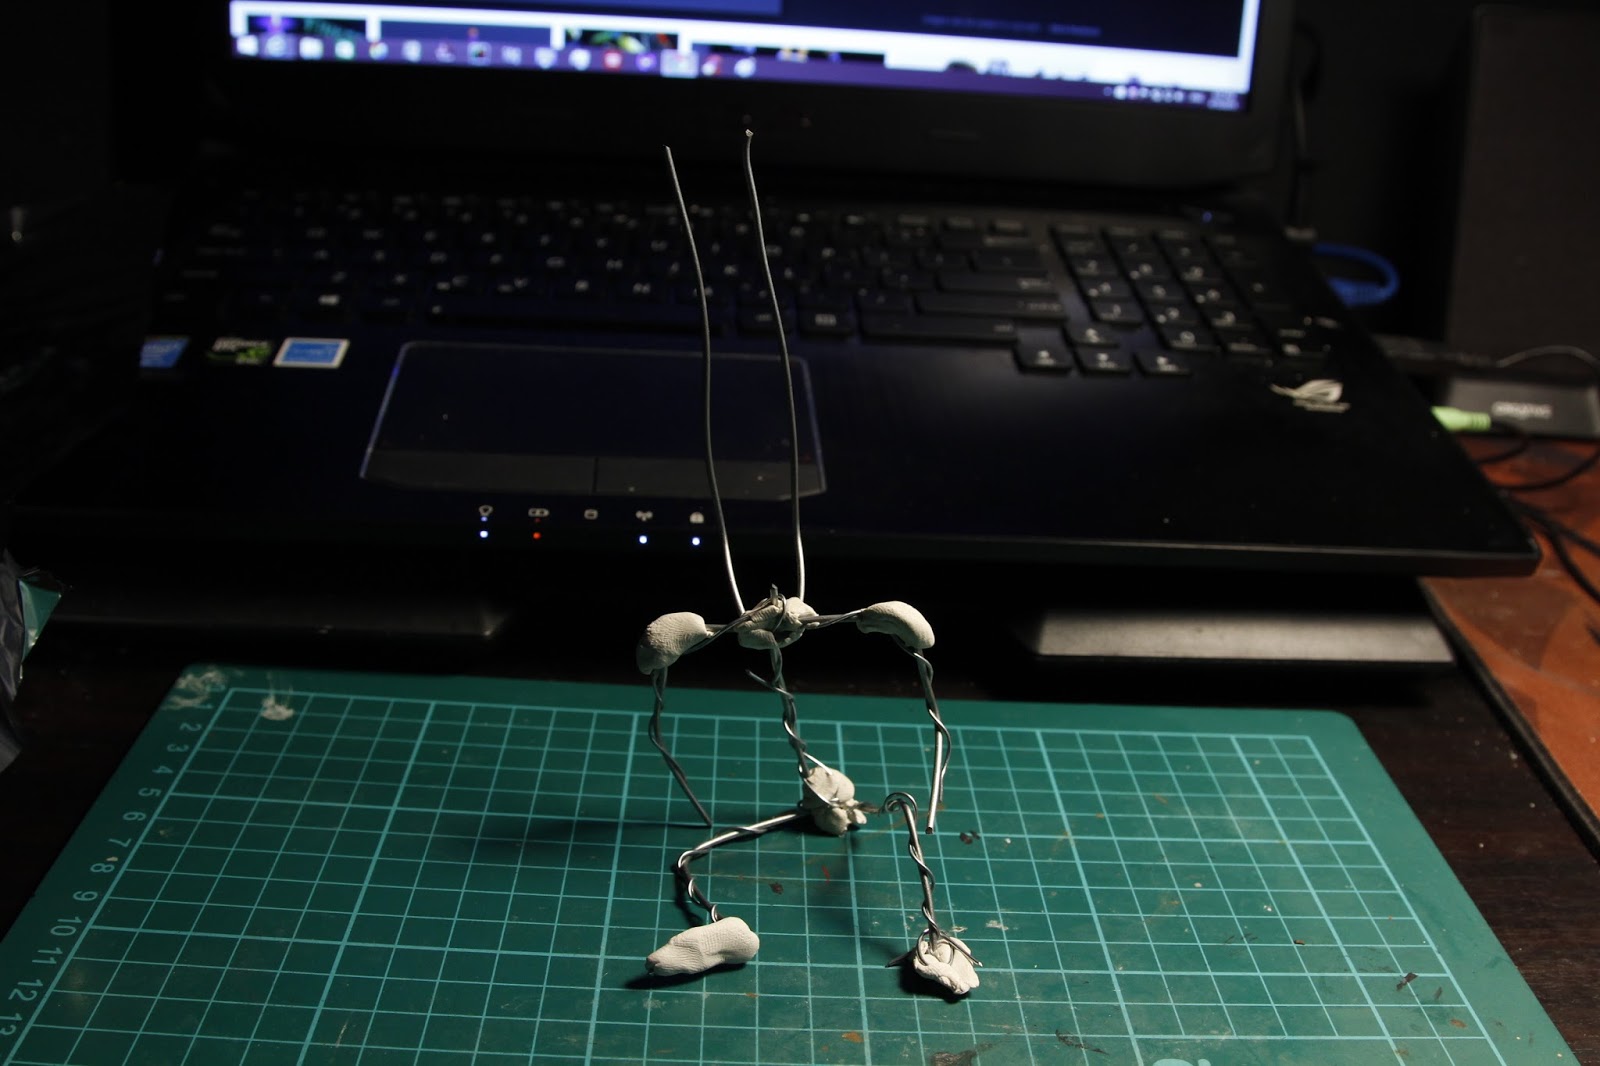
From here, you could see the progression of the clay creation, starting with the fundamental creature armature. Since Tinker was going to be sitting down, then, it's fitting that the armature does that too. Previously I was so consumed with the final product that I would've skipped fast trough the armature creation. For this one though, I took a long time on figuring out the armature.
Armatures are supposed to be the "bones" in your model, so devote a lot of time to it!
In the first picture you could see blu tack being used on the creatures' joints. This was done before aluminium foil was added to the body of tinker to create "mass" and beef up the "bones" from early on.
There's 2 rods extruding out from Tinker because that is the support for the mechanical arms later.


Next, we add some polymer clay on the body to beef up the figure. This is where we get the pose right.


 |
| Screengrab of the Dota 2 Character: Tinker |
Dear readers, if you are reading this now...continue reading you are in for a treat.
I'm sure many of you Dota 2 fans have been left inadequate after knowing that many toy makers don't have the rights to make Dota 2 figures.
There has been hearsay that Valve is reluctant to give rights to toy companies to make Dota 2 characters. Then again, nothing is concrete...perhaps they're waiting for the right toy company to come. Oh well.
 |
| On our twitter page, Neca gave a straight "No" to our question of whether there'll be any dota 2 figures from them. |
First I got inspired by this video:
I'd have to say, thank you for inspiring me on this journey to create this figure. And to a certain eager beaver who saw what I did with my custom "Tidehunter" and decided to take a leap of faith in me creating my most beautiful figure yet. You know who you are:)


 |
| One day a reader decided he'd want a dota 2 character customized by me. |
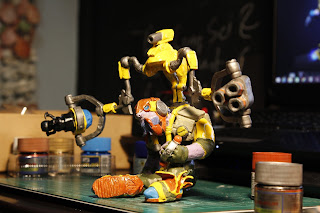
Well then...here's my finished product.
Look at that beauty!
 |
| Pretty cool huh? |
 |
| Leave your comments below on what you think I can improve on |
It took me a longer period than usual to complete this figure as the mechanical arms does defy gravity. But, where there's a will, there's a way.
If you've been reading this far, I promised you I'll give a treat right? I'm going to bring you through the steps and procedures to make this awesome figure. Ready?
Step 1 building an armature.
 |
| Aaaaannndd...We started off here, unglamorously. |
I've had some help to be completely honest. I had copied the basic steps to create my polymer clay figure from the video. Even down to the posture. I'm not afraid to admit it though. And I thank that video for it.


From here, you could see the progression of the clay creation, starting with the fundamental creature armature. Since Tinker was going to be sitting down, then, it's fitting that the armature does that too. Previously I was so consumed with the final product that I would've skipped fast trough the armature creation. For this one though, I took a long time on figuring out the armature.
Armatures are supposed to be the "bones" in your model, so devote a lot of time to it!
In the first picture you could see blu tack being used on the creatures' joints. This was done before aluminium foil was added to the body of tinker to create "mass" and beef up the "bones" from early on.
There's 2 rods extruding out from Tinker because that is the support for the mechanical arms later.
Step 2 Adding clay to beef up armature.


Next, we add some polymer clay on the body to beef up the figure. This is where we get the pose right.
Step 3 Adding all the details.

 |
| Tinkers head Front |
 |
| Tinkers head side. As with all head sculpts, take a lot of time for this part |
 |
| Attach the head and we have a nice tinker figure |


Step 4 Still focus on the details!
 |
| Just add wires to stretch the length of the previous "antennae" to create this. |
 |
| So we decided to now do the right and left mechanical arm blasters |

 |
| Every custom figure I make will come with my insignia: "CONFAD" |
 |
| All done |
Let me explain in details how I got to each part in step 4.
I used sculpey polymer clay and baked the main body(with the mechanical arms attached) separately from the two blasters.
**Warning** Baking both your blasters attached to your mechanical arms will make your mechanical arms wilt under the weight of the blasters. I learnt that the hard way, but then again, I should've known better.
Remember that you'd want to bake as less time as possible.
Don't attach the blasters to the arm just yet after theyre done baking.
Now it's time to paint the items separately.
Step 5 Painting all the separate parts
Now it's time to paint the items separately. Do not attach the separate parts yet, as it will be a hindrance when you paint. Instead, by painting separately, you can give a lot more attention to details.
 |
| I primed the statuette with white acrylic first |
 |
| ...and started to gradually paint some parts. |
Now since the primers are on and your hardened clay looks good, we'll proceed with painting the thing. Only after you paint the whole thing, can you piece it together.

 |
| So here we are. nice right?...not quite |
Now Be very wary that your paint might look good on the first glance, but it's actually not the best.
 |
| Sloppy painting |


Step 6 Fine tuning the painting
Now for the minor adjustments to the paint. We should be focusing on the contour of the body and also the scratches and etc.
Isn't it just wonderful. Especially the craft work.
Voila! All done. Ready to conquer the three lanes....Stay tuned to watch more polymer clay tutorials like this. Let me know in the comments below if you'd want me to post up the make-a-figure "tide hunter".
Visit our eBay store for a lot of reasonable items like toys, comics and tcg!
Confaderal ebay store!
2015©Confaderal
0 comments:
Post a Comment